Posted on

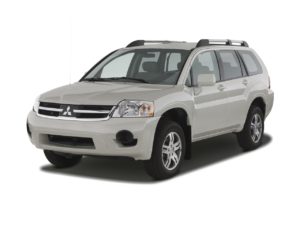
Mitsubishi Endeavor 2003-2011 Workshop Repair & Service Manual


Download Link

INSTANT DOWNLOAD (add to cart)


Complete digital official shop manual contains service, maintenance, and troubleshooting information for the Mitsubishi Endeavor 2003-2011. Diagnostic and repair procedures are covered in great detail to repair, maintain, rebuild, refurbish or restore your vehicle like a professional mechanic in local service/repair workshop. This cost-effective quality manual is 100% complete and intact as should be without any missing pages. It is the same factory shop manual used by dealers that guaranteed to be fully functional to save your precious time.

This manual for Mitsubishi Endeavor 2003-2011 is divided into different sections. Each section covers a specific component or system and, in addition to the standard service procedures, includes disassembling, inspecting, and assembling instructions. A table of contents is placed at the beginning of each section. Pages are easily found by category, and each page is expandable for great detail. It is in the cross-platform PDF document format so that it works like a charm on all kinds of devices. You do not need to be skilled with a computer to use the manual.

EXCERPT:
Engine Cooling System – Endeavor
GENERAL DESCRIPTION
The cooling system is designed to keep every part of the engine at appropriate temperature in whatever condition the engine may be operated. The cooling method is of the water-cooled, pressure forced circulation type in which the water pump pressurizes coolant and circulates it throughout the engine. If the coolant temperature exceeds the prescribed temperature, the thermostat opens to circulate the coolant through the radiator as well so that the heat absorbed by the coolant may be radiated into the air. The water pump is of the centrifugal type and is driven by the drive belt from the crankshaft. The radiator is the corrugated fin, down flow type.
CONSTRUCTION DIAGRAM
Fig. 1: Engine Cooling Construction Diagram
ENGINE COOLING DIAGNOSIS
INTRODUCTION
The system cools the engine so that it does not overheat and maintains the engine at an optimum temperature.
The system components are the radiator, water pump, thermostat, condenser fan assembly. Possible faults include low coolant, contamination, belt loosening and component damage.
TROUBLESHOOTING STRATEGY
Use these steps to plan your diagnostic strategy. If you follow them carefully, you will be sure to find most of the engine cooling faults.
1. Gather information from the customer.
2. Verify that the condition described by the customer exists.
3. Find and repair the malfunction by following the SYMPTOM CHART.
4. Verify that the malfunction is eliminated.
SYMPTOM CHART

Posted on

Mitsubishi Eclipse 1990-2012 Workshop Repair & Service Manual


Download Link

INSTANT DOWNLOAD (add to cart)


Complete digital official shop manual contains service, maintenance, and troubleshooting information for the Mitsubishi Eclipse, Eclipse Spyder 1990-2012. Diagnostic and repair procedures are covered in great detail to repair, maintain, rebuild, refurbish or restore your vehicle like a professional mechanic in local service/repair workshop. This cost-effective quality manual is 100% complete and intact as should be without any missing pages. It is the same factory shop manual used by dealers that guaranteed to be fully functional to save your precious time.

This manual for Mitsubishi Eclipse, Eclipse Spyder 1990-2012 is divided into different sections. Each section covers a specific component or system and, in addition to the standard service procedures, includes disassembling, inspecting, and assembling instructions. A table of contents is placed at the beginning of each section. Pages are easily found by category, and each page is expandable for great detail. It is in the cross-platform PDF document format so that it works like a charm on all kinds of devices. You do not need to be skilled with a computer to use the manual.

EXCERPT:
BODY – WINDOW GLASS
REMOVAL SERVICE POINTS
< > ROOF DRIP MOLDING REMOVAL
CAUTION: If the roof drip molding has become warped, should be replaced (do not re-use).
Use special tool MB990449 to lever out the roof drip molding.
< > WINDSHIELD REMOVAL
1. To protect the body (paint surface), apply cloth tape to all body areas around the installed
2. Using piano wire
(1) Using a sharp-point drill, make a hole in the windshield adhesive.
(2) Pass the piano wire from the inside of the vehicle through the hole.
(3) Using a sharp-point drill, make a hole in the windshield adhesive.
(4) Pass the piano wire from the inside of the vehicle through the hole.
CAUTION: Do not let the piano wire touch the edge of the windshield.
(5) Pull the piano wire alternately from the inside and outside along the windshield to cut the adhesive.
CAUTION: Putting glass adhesive knife too deeply into windshield adhesive may damage windshield.
3. Using glass adhesive knife
Keep glass adhesive knife at right angles with the
windshield edge, and put the blade at windshield edge and surface. Then cut away adhesive along the windshield edge.
4. Make mating marks on the windshield and body.
5. Use special tool MB990480 to remove the windshield.
CAUTION:
• Be careful not to remove more adhesive than is necessary.
• Be careful also not to damage the paintwork on the body surface with the knife. If the paintwork is damaged, repair the damaged area with repair paint or anti-rust agent.
6. Use a knife to cut away the remaining adhesive so that the
thickness is within 2 mm (0.08 inch) around the entire circumference of the body flange.
7. Finish the flange surfaces so that they are smooth.
CAUTION: Allow the cleaned area to dry for at least three minutes. Do not touch any surface that has been cleaned.
8. When reusing the windshield, remove the adhesive still adhering to the windshield, and clean with 3M AAD Part number 8906 or equivalent.
9. Clean the body side in the same way.
INSTALLATION SERVICE POINTS
>>A<< DRIP MOLDING CLIP A/DRIP MOLDING CLIP B INSTALLATION 1. The drip molding clips A and B differ according to where they are used, so check the identification color before installation. ... METERS AND GAUGES - Service Adjustment Procedures FUEL GAUGE SIMPLE INSPECTION (1) Remove connector from fuel gauge unit in fuel tank. (2) Ground the harness side connector via a test light (lZV-3.4W). (3) Turn ON ignition key. (4) Assure test light goes on and gauge needle moves. (5) If test light goes on but gauge needle does not move, replace fuel gauge. If test light does not go on (and gauge needle does not move), check fuse for broken wire, or resistance between gauge terminals (refer to P.8-208), or break in harness. Replace or repair defective parts. ENGINE COOLANT TEMPERATURE GAUGE SIMPLE INSPECTION (1) Remove connector from engine coolant temperature gauge unit in engine compartment. (2) Ground harness side connector via test light (12V-3.4W). (3) Turn ON ignition key. (4) Check that test light goes on and gauge needle moves. (5) If test light goes on but the gauge needle does not move, replace engine coolant temperature gauge. If test light does not go on (and gauge needle does not move), check fuse for broken wire, or resistance between gauge terminals (refer to P.8-208), or break in harness. Replace or repair defective part. OIL PRESSURE GAUGE SIMPLE TEST 1. Disconnect the wiring connector from the oil pressure gauge unit inside the engine compartment. 2. Ground the connector at the harness through a test light. 3. Turn the ignition key to the ON position. 4. Check to be sure that the test light flashes or lights steadily and the oil pressure gauge operates. 5. If both the test light and gauge operate, the circuit to the gauge unit is normal and the gauge unit itself is faulty. If the test light flashes or lights steadily but the gauge does not operate, the gauge is faulty. If neither the test light nor the gauge operates, the oil pressure gauge circuit is faulty. ...