Posted on

John Deere 260E and 310E Articulated Dump Trucks Repair Service Manual (TM13844X19)


INSTANT DOWNLOAD


Complete service repair manual with Electrical Wiring Diagrams for John Deere 260E and 310E Articulated Dump Truck, with all the technical information to maintain, diagnose, repair, and rebuild like professional mechanics.

John Deere 260E and 310E Articulated Dump Truck workshop service repair manual includes:
* Numbered table of contents easy to use so that you can find the information you need fast.
* Detailed sub-steps expand on repair procedure information
* Numbered instructions guide you through every repair procedure step by step.
* Troubleshooting and electrical service procedures are combined with detailed wiring diagrams for ease of use.
* Notes, cautions and warnings throughout each chapter pinpoint critical information.
* Bold figure number help you quickly match illustrations with instructions.
* Detailed illustrations, drawings and photos guide you through every procedure.
* Enlarged inset helps you identify and examine parts in detail.

TM13844X19 English – John Deere 260E and 310E Articulated Dump Truck Repair Technical Manual.pdf
tm13844x28 French – Camions-bennes articulés 260E et 310E
tm13844x59 Russian – 260E и 310E Самосвалы с шарнирно-сочлененной рамой
tm13844x63 Spanish – Volquetes articulados 260E y 310E

PRODUCT DETAILS:
Total Pages: 665 pages
File Format: PDF (Internal Links, Bookmarked, Table of Contents, Searchable, Printable, high quality)
Language: English

TABLE OF CONTENTS
Section 00: General Information…14
Group 0001: Safety…14
Information for European Union Directives and Customs Union Technical Regulations Compliance…20
Recognize Safety Information…24
Follow Safety Instructions…25
Operate Only If Qualified…26
Wear Protective Equipment…27
Avoid Unauthorized Machine Modifications…28
Inspect Machine…29
Stay Clear of Moving Parts…30
Avoid High-Pressure Fluids…31
Avoid High-Pressure Oils…32
Work In Ventilated Area…33
Handle Starting Fluid Safely…34
Avoid Static Electricity Risk When Refueling…35
Prevent Fires…37
In Case of Machine Fire…38
Prevent Battery Explosions…39
Handle Chemical Products Safely…40
Decommissioning — Proper Recycling and Disposal of Fluids and Components…41
Prepare for Emergencies…42
Clean Debris from Machine…43
Use Steps and Handholds Correctly…44
Start Only From Operator's Seat…45
Use and Maintain Seat Belt…46
Prevent Unintended Machine Movement…47
Avoid Work Site Hazards…48
Keep Riders Off Machine…50
Prevent Acid Burns…51
Avoid Backover Accidents…53
Avoid Machine Tip Over…54
Operating on Slopes…55
Operating or Traveling On Public Roads…56
Inspect and Maintain ROPS…57
Travel Safely…58
Add and Operate Attachments Safely…59
Park and Prepare for Service Safely…60
Service Cooling System Safely…61
Remove Paint Before Welding or Heating…62
Make Welding Repairs Safely…63
Drive Metal Pins Safely…64
Service Tires Safely…65
Group 0003: Torque Values…15
Metric Bolt and Cap Screw Torque Values…68
Additional Metric Cap Screw Torque Values…70
Unified Inch Bolt and Cap Screw Torque Values…72
Service Recommendations for 37° Flare and 30° Cone Seat Connectors…74
Service Recommendations for O-Ring Boss Fittings…76
Service Recommendations For Flared Connections—Straight or Tapered Threads…78
Service Recommendations For Flat Face O-Ring Seal Fittings…80
O-Ring Face Seal Fittings With SAE Inch Hex Nut And Stud End For High Pressure Service Recommendations…82
O-Ring Face Seal Fittings With Metric Hex Nut And Stud End For Standard Pressure Service Recommendations…84
O-Ring Face Seal Fittings With Metric Hex Nut And Stud End For High Pressure Service Recommendations…87
Service Recommendations for Metric Series Four Bolt Flange Fitting…89
Service Recommendations For Inch Series Four Bolt Flange Fittings…91
Inch Series Four Bolt Flange Fitting For High Pressure Service Recommendations…93
Service Recommendations For Non-Restricted Banjo (Adjustable) Fittings…95
Service Recommendations For O-Ring Boss Fittings With Shoulder…98
Metric 24° O-Ring Seal DIN 20078 Service Recommendations…101
Section 01: Wheels…105
Group 0100: Removal and Installation…105
Wheel Remove and Install…108
Tire Remove and Install…110
Section 02: Axles and Suspension Systems…113
Group 0200: Removal and Installation…113
Front Axle Remove and Install…118
Middle or Rear Axle Remove and Install…122
Group 0225: Input Drive Shafts and U-Joints…113
Transmission-to-Front Axle Drive Shaft or Transmission-to-Oscillation Joint Drive Shaft Remove and Install…133
Oscillation Joint Drive Shaft Remove and Install…133
Park Brake-to-Middle Axle Drive Shaft Remove and Install…137
Middle Axle-to-Rear Axle Drive Shaft Remove and Install…139
Group 0242: Axle Mounting Parts…113
Front Suspension Strut Remove and Install…144
Axle Links and Stabilizers Remove and Install…147
Axle Link, Stabilizer, and Strut Bushing Replace…150
Front Axle Pivot Disassemble and Assemble…153
Walking Beam Remove and Install…156
Walking Beam Bushing Remove and Install…161
Middle and Rear Axle Rubber Mount Remove and Install…163
Strain Gauge Remove and Install…480
Group 0250: Axle Shaft, Bearings, and Reduction Gears…113
Axle Planetary Pinion/Service Brake Housing Disassemble and Assemble…194
Axle Housing and Input Drive Disassemble and Assemble…220
Differential Disassemble and Assemble…241
Gear Tooth Contact Pattern Check…255
Group 0260: Hydraulic System…113
Front Axle Pump Remove and Install…260
Middle and Rear Axle Pump Remove and Install…262
Section 03: Transmission…263
Group 0300: Removal and Installation…263
Transmission Remove and Install…271
Group 0325: Input Drive Shafts and U-Joints…263
Engine-to-Transmission Drive Shaft Remove and Install…280
Group 0350: Gear, Shafts, and Power Shift Clutches…263
Transmission Speed Sensors Remove and Install…286
Group 0360: Hydraulic System…263
Transmission Oil Cooler Thermal Bypass Valve Remove and Install…291
Transmission Control Valve Remove and Install…292
Torque Converter Remove and Install…294
Clutch Control Valve Remove and Install…295
Retarder Control Valve Remove and Install…296
Oil Pump Remove and Install…297
Transmission Retarder Remove and Install…298
Transmission Control Valve Disassemble and Assemble…310
Clutch Control Valve Disassemble and Assemble…315
Retarder Control Valve Disassemble and Assemble…320
Oil Pump Disassemble and Assemble…325
Transmission Retarder Disassemble and Assemble…327
Section 04: Engine…338
Group 0400: Removal and Installation…338
John Deere Engine…340
Engine Remove and Install…341
Engine Crankshaft Damper Remove and Install…353
Section 05: Engine Auxiliary System…354
Group 0505: Cold Weather Starting Aids…354
Cold Start Aid—Starting Fluid Nozzle Remove and Install—If Equipped…357
Cold Start Aid—Starting Fluid Solenoid Remove and Install—If Equipped…359
Cold Start Aid—Block Heater Remove and Install—If Equipped…361
Diesel Fired Coolant Heater (DFCH) Remove and Install—If Equipped…364
Group 0510: Cooling Systems…354
Charge Air Cooler Remove and Install…370
Radiator Remove and Install…373
Hydraulic Oil Cooler Remove and Install…376
Transmission Oil Cooler Remove and Install…378
Fuel Cooler Remove and Install…382
Axle Oil Coolers Remove and Install…384
Group 0520: Intake System…354
Air Cleaner Remove and Install…387
Group 0530: External Exhaust Systems…354
Exhaust Tube Remove and Install…390
Dump Body Heater Pipe Remove and Install…392
Dump Body Heater Exhaust Collar Adjust…395
Group 0560: External Fuel Supply Systems…354
Fuel Tank Remove and Install…402
Fast Fill Fuel System Disassemble and Assemble—If Equipped…407
Section 07: Damper Drive…409
Group 0752: Elements…409
Output Damper Remove and Install…413
Section 09: Steering System…416
Group 0930: Secondary Steering…416
Secondary Steering Pump Remove and Install…419
Group 0960: Hydraulic System…416
Steering Valve Remove and Install…424
Steering Cylinder Remove and Install…427
Steering Bushing Replacement…431
Section 10: Service Brakes…432
Group 1011: Active Elements…432
Service Brake Assembly Remove and Install…434
Group 1060: Hydraulic System…432
Bleed Service Brake…437
Service Brake Accumulator Remove and Install…439
Service Brake Valve Remove and Install…441
Service Brake Valve Disassemble and Assemble…443
Section 11: Park Brake…447
Group 1111: Active Elements…447
Park Brake Pads Remove and Install…450
Park Brake Caliper Remove and Install…452
Park Brake Disc Remove and Install…455
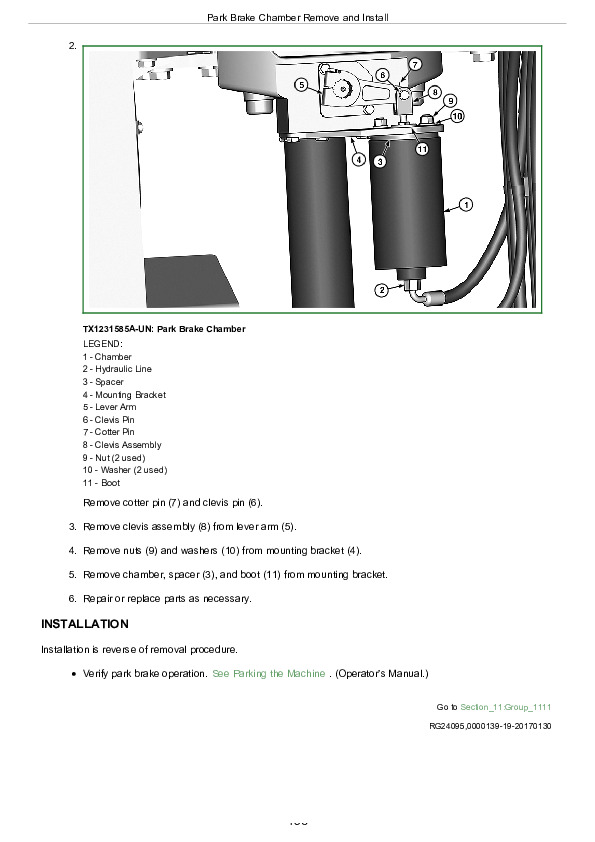
Park Brake Chamber Remove and Install…457
Section 16: Electrical System…459
Group 1600: Removal and Installation…459
Installation of Repair Wire Assembly (RWA)…468
TPM—Tire Pressure Sensor Remove and Install…476
Controllers Remove and Install…478
Strain Gauge Remove and Install…480
Connector Terminal Test…481
Replace (Push-Type) Metri-Pack® Connectors…484
Replace Metri-Pack® Connectors…485
Replace DEUTSCH® Circular Connectors…487
Replace DEUTSCH® Rectangular or Triangular Connectors…489
Install DEUTSCH® Contact…491
Replace Weather Pack™ Connector…493
Install Weather Pack™ Contact…495
Replace Cinch™ Connectors…497
Install Cinch™ Contact…499
Repair 32 and 48-Way Cinch™ Connectors…501
Section 17: Frame or Supporting Structure…506
Group 1740: Frame Installation…506
Welding On Machine…508
Front and Rear Frames Separate…509
Articulation Frame Remove and Install…515
Articulation Frame Bearings Disassemble and Assemble…518
Articulation Frame Bearings Adjust…520
Oscillation Joint Disassemble and Assemble…524
Section 18: Operator's Station…531
Group 1810: Operator Enclosure…531
Cab Remove and Install…538
Cab Mount Remove and Install…544
Cab Tilt Pump and Cylinder Remove and Install…548
Cab Tilt Cylinder Disassemble and Assemble…552
Windowpanes Remove and Install…553
Window Wiper and Wiper Motor Remove and Install…555
Group 1821: Seat and Seat Belt…531
Operator’s Seat Remove and Install…564
Seat Belt Remove and Install…567
Group 1830: Heating and Air Conditioning…531
R134a Refrigerant Cautions and Proper Handling…569
R134a Refrigerant Oil Information…570
R134a Refrigerant Recovery, Recycling, and Charging Station Installation Procedure…572
Recover R134a Refrigerant…574
Flush and Purge Air Conditioning System…575
Evacuate R134a System…578
Charge R134a System…580
Compressor Remove and Install…582
Condenser Remove and Install…585
High/Low-Pressure Switch Remove and Install…587
Receiver-Dryer Remove and Install…590
Expansion Valve Remove and Install…592
Heater Core and Evaporator Core Remove and Install…595
Blend Door Remove and Install…599
Mode Door Remove and Install…603
Freeze Control Sensor Remove and Install…606
Blower Motor Assembly Remove and Install…610
Section 19: Sheet Metal and Styling…612
Group 1910: Hood or Engine Enclosure…612
Hood Remove and Install…617
Engine Service Door Remove and Install…621
Group 1927: Fenders…612
Fender Remove and Install…626
Section 21: Main Hydraulic System…629
Group 2160: Hydraulic System…629
Main Hydraulic Pump Remove and Install…633
Hydraulic Reservoir Remove and Install…636
Front Hydraulic System Manifold Remove and Install…640
Front Hydraulic System Manifold Disassemble and Assemble…643
Rear Hydraulic System Manifold Remove and Install…647
Rear Hydraulic System Manifold Disassemble and Assemble…650
Hydraulic Fan Motor Left Side Remove and Install…653
Hydraulic Fan Motor Right Side Remove and Install…657
Left Hydraulic Fan Pump Remove and Install…661
Right Hydraulic Fan Pump Remove and Install…664
Hydraulic Component Failure Cleanup Procedure…665
General Oil Cleanup Procedure…668
Section 35: Haulage Device…671
Group 3540: Frames…671
Dump Body Remove and Install…674
Dump Body Align…676
Tailgate Remove and Install…678
Group 3560: Hydraulic System…671
Dump Body Lift Cylinder Remove and Install…687
Section 99: Dealer Fabricated Tools…690
Group 9900: Dealer Fabricated Tools…690
DFT1344 Supports…692
DFT1344A Supports…693
DFT1187 Bearing Driver…694
DFT1199 Bushing Pusher…695
DFT1200 Bushing Driver…696
JT38031 Bushing Driver…697
JT38058 Bushing Driver…698
JT38060 Bushing Driver…699
JT38064 Bushing Driver…700
JT38073 Bushing Driver…701
DFT1388 Hood Isolator Compression Test Tool…702

John Deere 260E and 310E Articulated Dump Trucks Repair Service Manual (TM13844X19)


INSTANT DOWNLOAD


Posted on

John Deere 260E and 310E Articulated Dump Trucks Operator’s Manual (OMT363010X19)


INSTANT DOWNLOAD


Complete Operator’s Manual for John Deere 260E and 310E Articulated Dump Trucks.

OMT363010X19 English – John Deere 260E and 310E Articulated Dump Trucks Operator’s Manual.pdf
omt363010x28 French – Camions-bennes articulés 260E et 310E
omt363010x59 Russian – 260E и 310E Самосвалы с шарнирно-сочлененной рамой
omt363010x63 Spanish – Volquetes articulados 260E y 310E

ALSO AVAILABLE:

omt184374 English – 310E Backhoe Loader Operator’s Manual.pdf

omt329817x19 English – 260E and 310E Articulated Dump Trucks Operator’s
omt329817x28 French – Camions-bennes articulés 260E et 310E
omt329817x63 Spanish – Volquetes articulados 260E y 310E

omt437831x019 English – 260E and 310E Articulated Dump Truck Operator’s Manual
omt437831x028 French – Camion-benne articulé 260E et 310E
omt437831x063 French – 260E y 310E Volquete articulado

PRODUCT DETAILS:
Total Pages: 501 pages
File Format: PDF (Internal Links, Bookmarked, Table of Contents, Searchable, Printable, high quality)
Language: English

TABLE OF CONTENTS
Section 1-1: Safety and Operator Convenience Features…41
Safety and Operator Convenience Features…41
Section 1-2: Safety—General Precautions…42
Information for European Union Directives and Eurasian Economic Union Technical Regulations Compliance…43
Recognize Safety Information…47
Follow Safety Instructions…48
Operate Only If Qualified…49
Wear Protective Equipment…50
Protect Against Noise…51
Avoid Unauthorized Machine Modifications…52
Inspect Machine…53
Stay Clear of Moving Parts…54
Avoid High-Pressure Fluids…55
Avoid High-Pressure Oils…56
Work In Ventilated Area…57
Handle Starting Fluid Safely…58
High Debris Applications…59
Avoid Static Electricity Risk When Refueling…60
Prevent Fires…62
In Case of Machine Fire…63
Prevent Battery Explosions…64
Handle Chemical Products Safely…65
Decommissioning — Proper Recycling and Disposal of Fluids and Components…66
Prepare for Emergencies…67
Clean Debris from Machine…68
Add Cab Guarding for Special Uses…69
Section 1-3: Safety—Operating Precautions…70
Use Steps and Handholds Correctly…71
Start Only From Operator's Seat…72
Use and Maintain Seat Belt…73
Prevent Unintended Machine Movement…74
Avoid Work Site Hazards…75
Avoid Power Lines…77
Keep Riders Off Machine…78
Prevent Acid Burns…79
Avoid Backover Accidents…81
Avoid Machine Tip Over…82
Operating on Slopes…83
Operating in Water and Mud…84
Operating or Traveling On Public Roads…85
Inspect and Maintain ROPS…86
Travel Safely…87
Add and Operate Attachments Safely…88
Section 1-4: Safety—Maintenance Precautions…89
Park and Prepare for Service Safely…90
Service Machines Safely…91
Use Proper Lifting Equipment…92
Service Cooling System Safely…93
Remove Paint Before Welding or Heating…94
Make Welding Repairs Safely…95
Drive Metal Pins Safely…96
Service Tires Safely…97
Section 1-5: Safety—Safety Signs and Other Instructions…99
Safety Signs and Other Instructions…99
Section 2-1: Operation—Operator's Station…113
Operator Controls…114
Operator Control Functions…116
Sealed Switch Module (SSM)…118
Primary Display Unit (PDU)…123
Primary Display Unit (PDU) Functions…125
Steering Column Lever…133
Pedals…134
Operator Seat and Instructional Seat…135
Cab Door Release…137
Cab Door Stop Adjustment…138
Opening Side Window/Alternative Exit…139
Opening Rear Side Window…140
Radio—If Equipped…141
Rear View Monitor—If Equipped…145
12-Volt Auxiliary Power Outlet…147
Fire Extinguisher Mounting Location…148
Section 2-2: Operation—Operating the Machine…149
Before Starting Work…151
Hood Operation…152
Inspect Machine Daily Before Starting…154
Engine Break-In Period…155
Starting Engine…468
Required Machine Stop Warning…159
Stopping Engine…468
Service ADVISOR™ Remote (SAR) Software Delivery Process…163
Engine Block Heater—If Equipped…164
Cold Weather Warm-up…165
Diesel Fired Coolant Heater (DFCH) Operation—If Equipped…166
Replace Start Aid Can—If Equipped…170
Parking the Machine…172
Battery Disconnect Switch…174
Warming Hydraulic System…478
Air Conditioner and Heater Operation…176
Driving the Machine…179
Steering Machine…180
Shifting the Transmission…472
Using Gear Hold and Gear Range…184
Using Operator Speed Control…186
Using Differential Lock…187
Slowing and Stopping the Machine…190
Operating on a Hill…193
Off-Road Operation…195
Loading and Unloading Dump Body…196
Dump Body Manual Lowering Procedure…198
Dump Body Control…199
Using Onboard Weighing (OBW) System—If Equipped…202
Machine Light Operation…204
Freeing Stuck Machine…207
Towing Machine…209
Removing Drive Shafts for Towing…211
Mechanically Releasing Park Brake…212
Lifting the Machine…214
Loading and Unloading Machine for Transport…216
Lock All Compartments…220
Section 2-3: Operation—Monitor Operation…221
Primary Display Unit (PDU) Display…222
Primary Display Unit (PDU) Display Messages…223
Information—Machine Settings…225
Information—Operator Training…226
Main Menu…227
Operation—Stop Watch…229
Operation—Job Timer…230
Operation—Trip Counters…231
Operation—Life Counters…232
Operation—Reverse Fan—If Equipped…233
Diagnostics—Codes…234
Diagnostics—Controller ID…235
Diagnostics—Machine ID…237
Diagnostics—JDLink™ System Info…238
Diagnostics—Software Delivery…239
Diagnostics—Battery Monitor…240
Diagnostics—Tire Sensors—If Equipped…241
Setup—Monitor…243
Setup—Antitheft/Security…244
Setup—Operator Settings…246
Setup—Test and Setup…247
Section 3-1: Maintenance—Machine…248
Required Emission-Related Information…249
Alternative and Synthetic Lubricants…250
Hydraulic Oil…251
Transmission Oil…253
Grease…254
Axle and Final Drive Oil…255
Lubricant Storage…256
Mixing of Lubricants…257
Diesel Fuel…258
Lubricity of Diesel Fuel…260
Handling and Storing Diesel Fuel…261
Biodiesel Fuel…262
Testing Diesel Fuel…264
Supplemental Diesel Fuel Additives…265
Fuel Filters…266
Minimizing the Effect of Cold Weather on Diesel Engines…267
Diesel Engine Break-In™ Oil— Non-Emissions Certified and Certified Tier 1, Tier 2, Tier 3, Stage I, Stage II, and Stage III…248
Diesel Engine Oil…270
Engine Oil and Filter Service Intervals…296
Diesel Engine Oil Service Interval for Operation at High Altitude…274
Oil Filters…275
Diesel Engine Coolant (engine with wet sleeve cylinder liners)…276
Water Quality for Mixing with Coolant Concentrate…278
Operating in Warm Temperature Climates…279
Testing Coolant Freeze Point…280
Disposing of Coolant…282
Section 3-2: Maintenance—Periodic Maintenance…283
Service Machine at Specified Intervals…284
Check the Hour Meter Regularly…285
Prepare Machine for Maintenance…286
Fuel Tank…288
Installation and Removal of Dump Body Locking Bar (Pin)…289
Install Articulation Locking Bar…291
Tilt Cab…292
Fluid Analysis Program Test Kits and 3-Way Coolant Test Kit…295
Service Intervals…296
Required Parts…298
Section 3-3: Maintenance—As Required…300
Inspect Tires and Check Pressure…301
Check Wheel Bolt Torque…303
Check Service Brake Disc Wear…304
Check Engine Air Cleaner Elements…306
Inspect Serpentine Belt…308
Clean Cooler Cores…310
Drain Primary Fuel Filter With Water Separator…312
Drain Final Fuel Filter…313
Drain Auxiliary Fuel Filter With Water Separator—If Equipped…314
Check Windshield Washer Fluid Level…315
Check Cab Air Filters…316
Check Rear Camera—If Equipped…318
Inspect Steering Cylinder Seals…319
Clean and Tighten Battery Terminals…320
Section 3-4: Maintenance—Every 10 Hours or Daily…321
Check Engine Coolant Level…322
Check Engine Oil Level…324
Check Hydraulic System Oil Level…326
Check Transmission Oil Level…327
Section 3-5: Maintenance—Every 50 Hours…329
Lubricate Articulation Joint, Oscillation Joint, and Through-Drive Bearing…330
Lubricate Greasable Steering Cylinder Pins—If Equipped…332
Section 3-6: Maintenance—Every 250 Hours…333
Take Engine Oil Sample…334
Drain and Refill Engine Oil and Replace Filter…350
Section 3-7: Maintenance—Initial Service-500 Hours…337
Replace Axle Oil Filters—If Equipped…364
Run Transmission Clutch Calibration…381
Drain and Refill Axle Oil…369
Section 3-8: Maintenance—Every 500 Hours…344
Check Hybrid Battery Electrolyte Level—If Equipped…345
Take Fluid Samples…348
Check Air Intake Hoses and Charge Air Cooler Tube Couplings…349
Drain and Refill Engine Oil and Replace Filter…350
Drain and Refill Engine Oil (Quick Service)—If Equipped and Replace Filter…352
Replace Fuel Tank Breather—If Equipped With Fast Fill…354
Replace Primary Fuel Filter with Water Separator…355
Replace Auxiliary Fuel Filter with Water Separator—If Equipped…356
Replace Final Fuel Filter…357
Check Park Brake Pad Wear and Lubricate Linkage…358
Section 3-9: Maintenance—Every 1000 Hours…360
Check and Adjust Dump Body Shock Pads…361
Check Coolant Condition…363
Replace Axle Oil Filters—If Equipped…364
Check Axle Oil Levels…367
Section 3-10: Maintenance—Every 2000 Hours…368
Drain and Refill Axle Oil…369
Clean and Inspect Axle Breathers…371
Check and Adjust Engine Valve Lash…372
Replace Fuel Tank Breather…373
Clean Axle Pump Suction Screen—If Equipped…374
Drain and Refill Transmission Oil and Replace Filters…376
Drain and Refill Transmission Oil (Quick Service)—If Equipped…378
Replace Transmission Oil Filters…379
Run Transmission Clutch Calibration…381
Section 3-11: Maintenance—Every 4000 Hours…382
Clean Hydraulic Pump Case Drain In-Line Screen…383
Clean Hydraulic Fan Drive Case Drain In-Line Screen…385
Clean Hydraulic System Fill Strainer…387
Replace Hydraulic System Return Filter…388
Drain and Refill Hydraulic System Oil…390
Drain and Refill Hydraulic System Oil (Quick Service)—If Equipped…392
Replace Hydraulic Reservoir Breather…393
Section 3-12: Maintenance—Every 6000 Hours…394
Drain and Refill Engine Cooling System…395
Drain and Refill Engine Cooling System (Quick Service)—If Equipped…397
Inspect Driveline Torsional Coupler…399
Section 4-1: Miscellaneous—Machine…400
Bleed Fuel System…401
Secondary Steering…403
Lubricate Hinges…404
Verified Anchor Point Information…405
Fluid Sampling Test Ports…406
Do Not Service Control Valves, Cylinders, Pumps, or Motors…409
Do Not Service or Adjust Injection Nozzles or High-Pressure Fuel Pump…410
Precautions for Alternator and Regulator…411
Handling, Checking, and Servicing Batteries Carefully…412
Using Battery Charger…415
Using Booster Batteries—24-Volt System…417
Replacing Batteries…419
Welding on Machine…421
Keep Electronic Control Unit Connectors Clean…422
Replacing Fuses…423
JDLink™ Machine Monitoring System (MMS)—If Equipped…427
Replace Front Turn Signal Bulb, Headlight Bulb, and Front Park Light Bulb…428
Replace Tail and Brake Light and Rear Turn Signal…430
Replace Backup Light and Work Light—If Equipped…431
Replace License Plate Light Bulb—If Equipped…432
Replace Dome Light Bulb…433
Replacing Seat Belt…434
Hardware Torque Specifications…437
Unified Inch Bolt and Screw Torque Values…438
Metric Bolt and Screw Torque Values…441
Section 4-2: Miscellaneous—Operational Checkout…444
Operational Checkout…444
Section 4-3: Miscellaneous—Troubleshooting…465
Troubleshooting Procedure…466
Software Update…467
Engine…468
Transmission…472
Axle…475
Tires…476
Brakes…477
Hydraulic System…478
Electrical System…479
Rear Frame and Cab…481
Section 4-4: Miscellaneous—Storage…482
Prepare Machine for Storage…483
Monthly Storage Procedure…485
Section 4-5: Miscellaneous—Serial Numbers…487
Record Product Identification Number (PIN)…488
Record Engine Serial Number…489
Record Transmission Serial Number…490
Record Front Axle Serial Number…491
Record Middle Axle Serial Number…492
Record Rear Axle Serial Number…493
Keep Proof of Ownership…494
Keep Machines Secure…495
Section 4-6: Miscellaneous—Specifications…496
260E and 310E Engine Specifications…497
260E Machine Dimensions…498
310E Machine Dimensions…501
260E Machine Specifications…504
310E Machine Specifications…505
260E and 310E Travel Speeds…506
Drain and Refill Capacities…507
Eurasian Economic Union…508
Machine Design Life…509

John Deere 260E and 310E Articulated Dump Trucks Operator’s Manual (OMT363010X19)


INSTANT DOWNLOAD