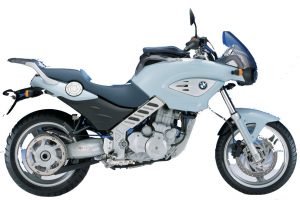
Complete digital official shop manual contains service, maintenance, and troubleshooting information for the 1994-2008 BMW F650, F650CS, F650GS, F650ST, F650 Funduro, F650ST Strada. Diagnostic and repair procedures are covered in great detail to repair, maintain, rebuild, refurbish or restore your vehicle like a professional mechanic in local service/repair workshop. This cost-effective quality manual is 100% complete and intact as should be without any missing pages. It is the same factory shop manual used by dealers that guaranteed to be fully functional to save your precious time.
This manual for BMW F650 1994-2008 is divided into different sections. Each section covers a specific component or system and, in addition to the standard service procedures, includes disassembling, inspecting, and assembling instructions. A table of contents is placed at the beginning of each section. Pages are easily found by category, and each page is expandable for great detail. It is in the cross-platform PDF document format so that it works like a charm on all kinds of devices. You do not need to be skilled with a computer to use the manual.
’00-’08 F650GS (EN).pdf
’01-’06 F650CS (EN).pdf
’94-’00 F650, F650ST (EN).pdf
’00-’08 F650GS (DE).pdf
’94-’95 F650 (F650ST Strada, F650 Funduro) (FR).pdf
’94-’95 F650 (F650ST Strada, F650 Funduro) (ES).pdf
EXCERPT:
Contents
Group / Chapter
00 Tightening torques, Operating fluids
00 Pre-delivery check
00 Maintenance
11 Engine
12 Engine electrics
13 Fuel preparation and control
16 Fuel tank and lines
17 Radiator
18 Exhaust system
21 Clutch
23 Gearbox
27 Chain/belt drive
31 Front forks
32 Steering
33 Rear wheel drive
34 Brakes
36 Wheels and tires
46 Frame
51 Equipment
61 General electrical equipment
62 Instruments
63 Lights
17 40 000 Removing and installing fan
Remove right cover ( a 46.6).
Unclip the MoDiTeC plug from its holder.
Disconnect plug for fan.
Disengage the clips at top and bottom and remove the fan.
If necessary, remove fan from fan shroud.
Installation is the reverse of the removal procedure, pay particular attention to the following.
Slide the rubber grommet of the fan onto the pin of the expansion tank and then engage the tabs of the fan on the radiator.
33 Rear wheel drive
Technical Data …….. 3
Removing and installing suspension strut………5
Removing and installing rear swinging arm……6
Removing and installing needle roller races in rear swinging arm….8
Removing needle roller races ..8
Installing needle roller races ….8
Removing and installing needle bearings in rear swinging arm……..9
Removing needle roller bearing ………..9
Installing needle roller bearing ………..10
Removing and installing reaction link …..10
Removing and installing angled lever ….. 11
Removing and installing needle roller bearings and needle roller races in angled lever …….. 11
Removing needle roller bearings and needle roller races ……. 11
Installing needle roller bearings and needle roller races ……… 12
Removing and installing drive damper…..15
Measuring runout of belt pulley…13
Removing and installing eccentric with drive shaft
Separating eccentric from drive shaft 16
Removing and installing floating bearing of eccentric 16
Removing and installing fixed bearing of eccentric ….17
Pressing eccentric onto drive shaft …17
Contents
General view of crated motorcycle
Checking the shipping crate for damage
In case of damage in Germany
In case of damage in importer markets
Unpacking the motorcycle
Inspecting motorcycle for damage
Installing remaining items on motorcycle
Installing windscreen
Installing front mudguard, mirrors and handlebar weights
Filling and charging the battery
Removing right and centre covers
Filling and charging the battery
Checking that delivery is complete
Reading the fault code memory with the BMW MoDiTeC
Checking tyre pressures
Adding fuel to tank
Final inspection and function check
Final cleaning
Handing over the motorcycle
Inhalt
Übersicht Verpackung
Transportverschlag auf Schäden prüfen
Im Schadensfall in Deutschland
Im Schadensfall in Importeursmärkten
Motorrad auspacken
Motorrad auf Schäden prüfen
Motorrad komplettieren
Windschild anbauen
Vorderradkotflügel, Spiegel und Lenkergewichte anbauen
Batterie befüllen und laden
Cover rechts/mitte ausbauen
Batterie befüllen und laden
Vollständigen Lieferumfang prüfen
Fehlerspeicher mit BMW MoDiTeC auslesen
Reifenluftdruck prüfen
Kraftstoff einfüllen
Funktionsprüfung als Endkontrolle
Abschlußreinigung
Fahrzeugübergabe
23 00 622 Disassembling and reassembling compensating shaft
Clamp the compensating shaft in a vise fitted
with protective jaws.
Pull off gearwheels (1, 2).
Pull off needle roller bearing (3) and washer (4).
Pull off gearwheel (5).
Remove circlip (6) with special pliers,
BMW No. 23 4 500.
Pull off washer (7) and gearwheel (8).
…
