INSTANT DOWNLOAD (add to cart)
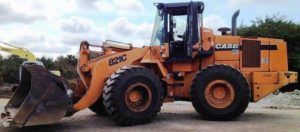
Case 821C Wheel loader Workshop Repair & Service Manual
total 3,000+ pages, bookmarked, Searchable, Printable, high quality PDF
7-12102 – Case 821C Loader Service Manual (EN).pdf – 716 pages
7-15741 – Case Chargeuse 821C Manuel d’entretien (FR).pdf- 564 pages
6-1241 – 821C Operators Manual.pdf- 240 pages
6-12340 – C-Series Wheel loader Cares Manual, Machine Location, Job Code Manual.pdf
7-13051 – 821C Loader Service Manual.pdf- 716 pages
7-13053 – 821C Loader Service Manual.pdf- 759 pages
7-59391 – 821B Loader Complete Schematic Set.pdf- 192 pages
Wheel Loader Series 21 C Training Manuel.pdf- 210 pages
Complete digital official shop manual contains service, maintenance, and troubleshooting information for the Case 821C Wheel loader. Diagnostic and repair procedures are covered in great detail to repair, maintain, rebuild, refurbish or restore your Case 821C Wheel loader like a professional mechanic in local service/repair workshop. This cost-effective quality manual is 100% complete and intact as should be without any missing pages. It is the same factory shop manual used by dealers that guaranteed to be fully functional to save your precious time.
This manual for Case 821C Wheel loader is divided into different sections. Each section covers a specific component or system and, in addition to the standard service procedures, includes disassembling, inspecting, and assembling instructions. A table of contents is placed at the beginning of each section. Pages are easily found by category, and each page is expandable for great detail. It is in the cross-platform PDF document format so that it works like a charm on all kinds of devices. You do not need to be skilled with a computer to use the manual.
EXCERPT:
6004-40
Adjust Backlash and Bearing
Preload
STEP 175
Place a dial indicator right-angled at the outer diameter of the tooth flank (ring gear).
Adjust the pinion to ring gear backlash to the low side of specifications (see value etched on the outer diameter of the ring gear) by alternately turning each of the adjusting nuts to move the ring gear closer to or further away from the pinion. Backlash is checked using a dial indicator against a tooth on the ring gear.
NOTE: Rotate the differential several times and recheck the backlash.
STEP 176
Go to the adjusting nut opposite the ring gear and loosen the nut approximately one turn to release pressure on the bearing. It should be very noticeable that pressure is released on the bearing, as the adjusting nut will turn much easier.
STEP 177
Tighten the adjusting nut slowly until firm contact is made with the bearing.
NOTE: As the adjusting nut makes firm contact with the bearing, the adjusting nut will immediately begin
to turn much harder.
STEP 178
To adjust the bearing preload, note the position of the adjusting nut. Now tighten the nut two additional
notches.
STEP 179
As the bearing preload is adjusted as described in steps 176, 177 and 178, pinion to ring gear backlash may increase slightly. Check pinion backlash to confirm that it is within specifications. If backlash is
outside of specified range, repeat step 175 through 179 again.
STEP 180
A8
Coat several teeth on the ring gear with marking ink and roll the ring gear in both directions over the drive pinion.
Compare the obtained tooth contact pattern with the examples on page 4 and 5.
ATTENTION: If the tooth contact pattern differs, there has been a measuring error at determination of the shim. This must be corrected.
STEP 181
Install both adjusting nuts with the slotted pins on the differential carrier.
STEP 182
BD01F099
Install the CAS2846 pinon lifting bail onto the pinion shaft and insert the differential carrier into the axle casing.
NOTE: Align the two alignment marks together.
ATTENTION: Apply sealing compound on the mounting surface.
STEP 183
Install new bolts on the differential carrier.
Tighten torque ……… 250 Nm (185 pound-feet)
STEP 184
Insert the stub shaft into the spline of the axle bevel gear.
STEP 185
Install the thrust washer removed at disassembly in the sun gear shaft with grease.
…

